

CleanGSR
-
Posts
11,978 -
Joined
-
Last visited
Content Type
Profiles
Forums
Events
Gallery
Articles
Media Demo
Posts posted by CleanGSR
-
-
...
Adding to the original post since people get butthurt about product selection. The original post is a good guide regarding steps and techniques. Product selection plays a small role in the overall results and can be a big personal preference from person to person. I no longer even use the stuff listed in the first post (though I change up products about as often as underwear)
-
ok sooooo these say u have to use them with ground control coil overs...does it matter that i just have sleeves?
I don't know....that's the reason I got a set of fabbed up stockers....just in case. Plus they were a ton cheaper. I paid $40 for all 4 top hats extended from a guy on Honda-Tech.
-
so do these tophats need to be welded? or is it a bolt on?
and i realized that i shouldnt worry to much about blowing my stuts since my current neuspeed springs how dropped the car so much that i cant touch the top of the rear tires...so its about 3/4 inches below the tire line so tecnically these coil overs will lift the car from the current stance... ?
but id still like the tophats...were can i get them? >_< im an idiot. haha
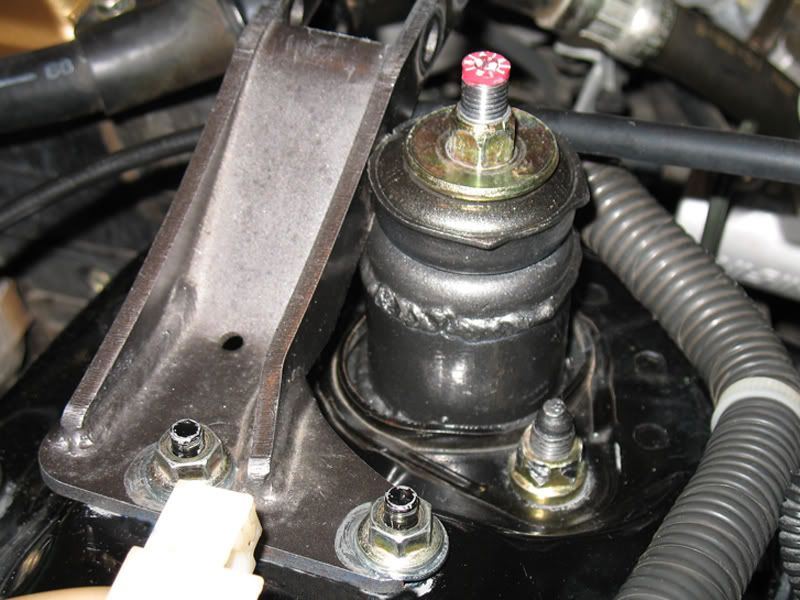
You don't buy them...you make them by welding a piece of pipe to extend them up. If you notice the weld that goes around the top hat toward the top......the pipe section below that was added to the original top hat. The top hat was cut and that pipe welded in.
Doing this will give you extra shock travel by letting the shock extend past the original point. Extended top hats will not change your ride height at all.
-
Extended Top hats. Well, first....the top hat is the top portion that the shock bolts to before installing the assembly into the car. When you extend them it gives the shock additional room to travel beyond the normal point.
Notice how much higher the top hat is than a normal one?
Front
Rear
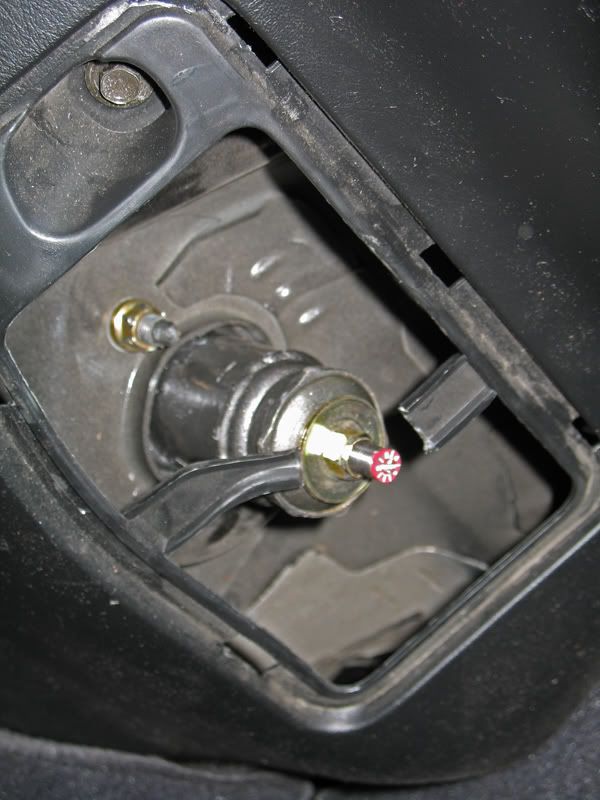

If you notice the welds around the top hat....that is where it was extended.
-
VTEC = variable valve timing with lift electric control (dont know if it was stated earlier in the thread, im a little toolazy to look today)
oh and i used to have a HUGE book on honda when i was younger (i started studying honda when i was about 10) and i still have it, its back home, it has EVERYTHING about honda engines... i learned alot from that book, i need to get a mitsubishi book now

Yep...it was stated in the 1st and 2nd posts in this thread....hopefully this bump will realize that adding an "H" at the end stands for "for Homosexuals"
VTECH = Variable Valve Timeing with Left Electronic Control for Homosexuals"
-
Here's a quick walkthrough of how to drop the shock in your front shock fork. I wish I had taken pictures when I did this, but I didn't, so here's the best I could come up with. This can be done with stock shocks as well to get extra travel in the front.....THIS WILL LOWER THE FRONT THOUGH....so don't do this mod without coilovers otherwise the front will be much lower than the rear and look dumb.
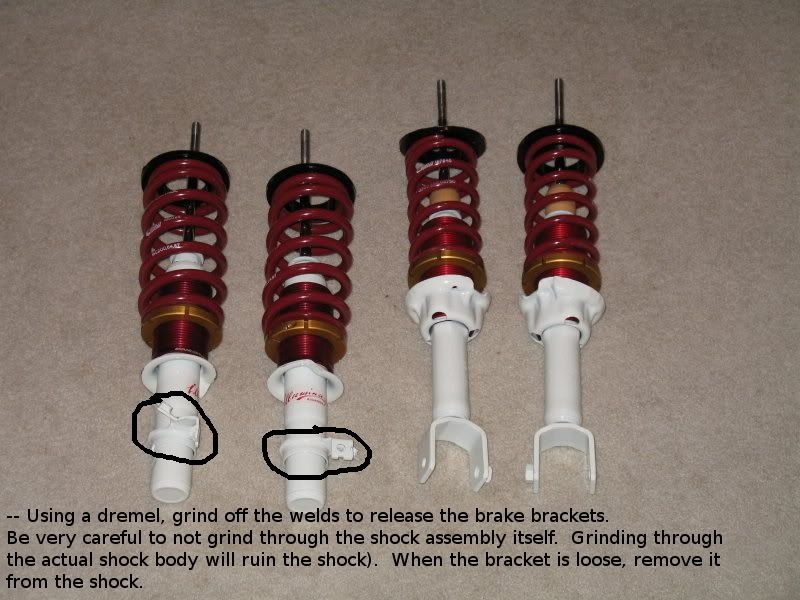
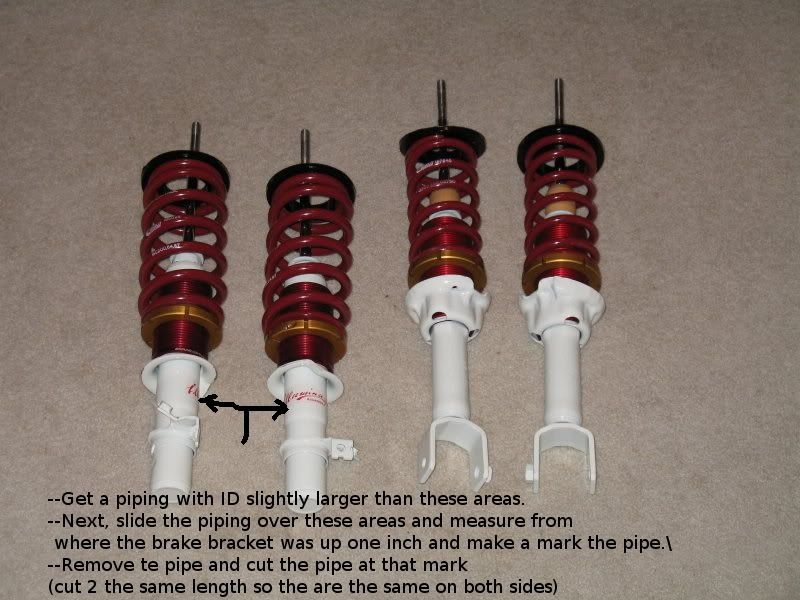
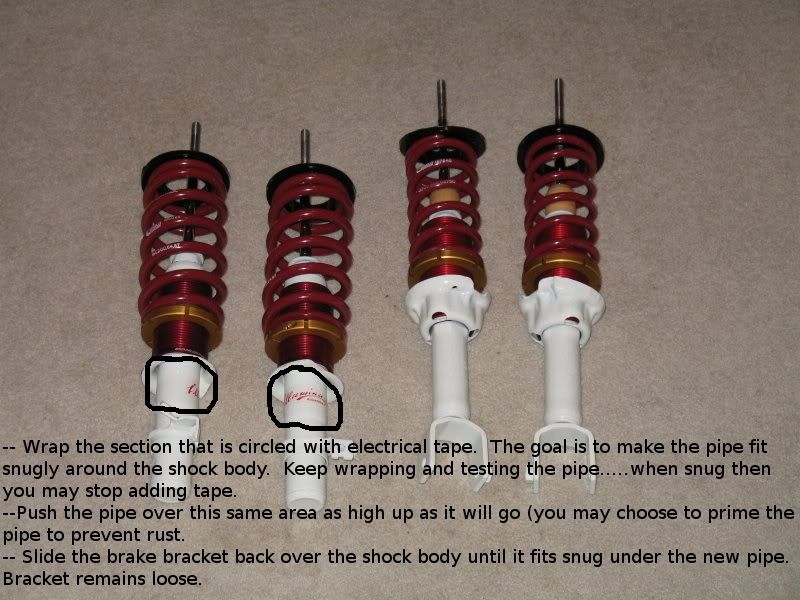
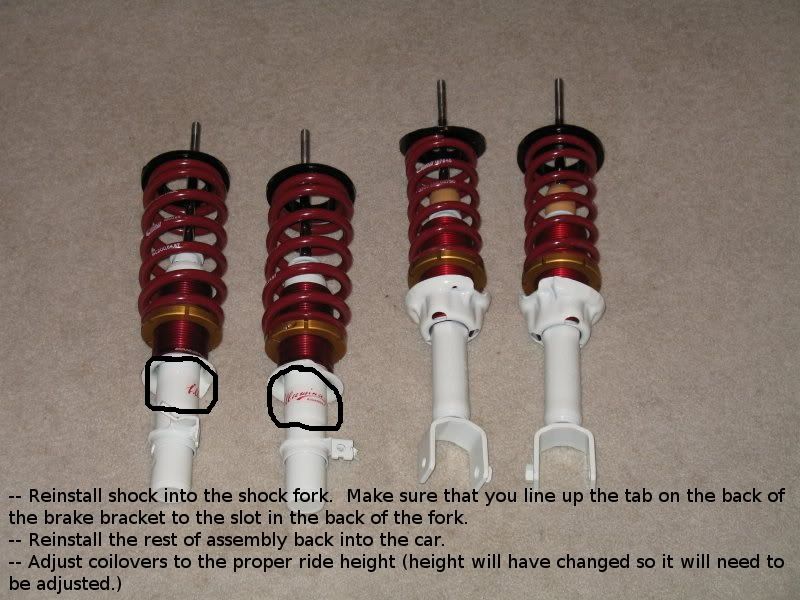
If you are just going for extra shock travel and don't plan to lower anymore....then measure the ride height before doing this. When youi are done, just raise the coilover back to that same ride height and whoala....you have the same ride height with an extra inch or so of shock travel to keep away the fear of blowing the shocks.
Also, you have no worries about the loose brake bracket. When reinstalled into the shock fork, the fork will keep it snugly in place and it will be a plenty tight fit.
-
For cheap people here's the solution. (If I had thought of this I would have done it while saving for my shocks).
Ground Control Coilovers = $300
Stock Struts = Free
Extended Top Hats (4) = $100
Run Extended Top Hats and go with 1.25-1.5 inch in the front and 1.75-2 inch in the rear. Then Drop the coilovers to about a 2" drop all around. As far as your stock struts are concerned you'll only be dropped half an inch in the front and none in the back so you won't have to worry about blowing them.
Edit: If you want to go even lower on stock shocks then here's another thing. Since you are running stock shock travel in the rear per above then you could easily go another half inch (to a 2.5" drop) in the back......on the front that's pushing it though since you are going to have the shock travel of a 1" - 1.25" drop in the front with a 2.5" drop.
So......modify the lower portion of the front shocks where the shock sits in the fork. There are write ups on how to do this and basically you drop it in the fork another inch. What this does is drops the car in the front by and inch therefore letting you rasie back up and get your shock travel back. If you don't want to raise, then it will lower you an inch without losing any extra shock travel. I did this with my illumina's and have since run probably 30,000 miles on them with no problems.
In an afternoon you could easily drop your car nearly 3 inches with stock shocks and never worry about blowing them....just takes a little extra DIY....so if you don't care about performance and just want a mild-heavy drop without blowing the stock shocks then this is the solution.
-
We can claim you are though.

Thanks for the info the other day man. Saved my car's a$$, errr trunk.
So that ended up turning out well? I'm so happy if it did and glad you got it back to normal.
-
Just thought I'd post something up since the title comes across a little arrogant and that was very unintentional.
I did not come up with the 2 bucket method and don't claim it to be the only proper way (1 bucket + foam gun is the only other proper way though IMO). I also don't claim to be God's gift to the detailing world and there are a ton of people worlds better than me at detailing and buffing. I can hold my own though and merely try to pass on what little I know to other's so they can take the best care possible of their car.
Everything I've learned, I learned from the awesome community of people at www.autopia.org. Just wanted to make sure people don't think I consider myself to be something special, cause I'm merely a guy that wants to see the fewest swirl marks possible on the roads.
-
dooo ittttt!
I need my enigne bay done... bad! lol
what products would you reccomend for just a nice and easy waxing? thanks! All hail the detail king!
Clay Bar and then wax. Clay would be the least amount of prep I would do if I was you. If you don't have a buffer to remove swirls, then get something that has some fillers to at least hide some of the swirls. NXT 2.0 has fillers and would look better on an unprepped surface than something without fillers.
That, said, I never really recommend not doing the proper prep (i.e. polishing out swirls and scractches) but understand that it's not possible for some people.
-
Hung, didn't you have a full detailing thread too, back in the day?
Good stuff.
I know I did one on engines, but don't remember one on buffing. Next car I do, I might take a video of each process and show the results, then do a video tutorial + writeup. This way people would have some type of instructions to follow when/if they buy the tools.
-
I'm going to bump this up for some of the new members we have, just in case they are interested.
I have a few comments to add:
I do NOT use an absorber anymore (well I do on my glass, but that's it). I did find it to slightly marr the finish. Honda's have really, really soft paint/clear and easy to marr. The absorber just wasn't soft enough for my car.
Second, regarding the steel wool on glass. There is a much, MUCH, better way to clean glass. Much faster and better results than steel wool. If you have a PC7336 or similar buffer then use a white or orange LC pad and some Optimum PoliSeal (I've also used DG105, but not as good as PoliSeal). Spread it on the glass on speed 3-4 and then work it to a haze at speed 6. It wipes off really easy and actually polishes imperfections out of the glass with the slight abrasives. Poli-Seal is also an AIO sealant so it will seal your glass, make it slicker and protect it from the elements better. The bonus, I can do all of the glass on a car in about 4-5 minutes tops.
-
Nancy << Awesome Seller
-
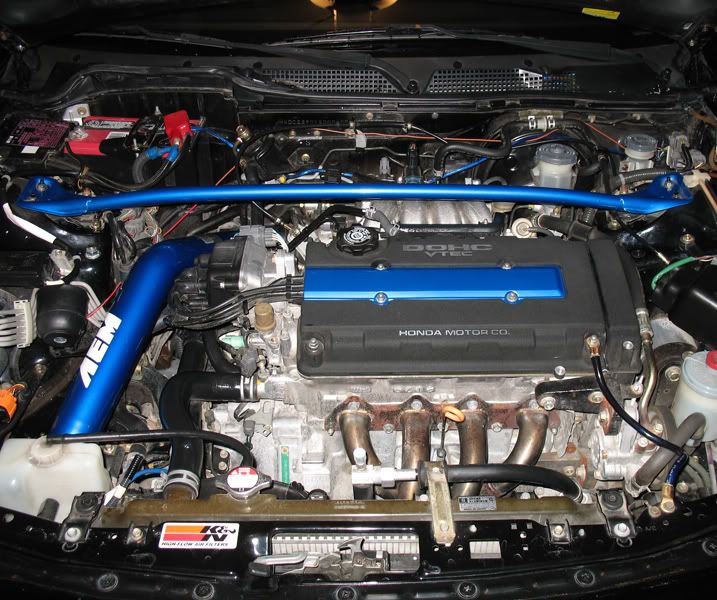
Well, everybody's seen mine so I hadn't posted them.....but here they are anyway.
Wheels maybe sold soon!!!


Winterized....
My engine doesn't look like this anymore.....soon to get a complete makeover
-
Well there are both sealants and waxes that are good with durability.
Almost all sealants though will have really good durability. Some waxes like Pinnacle Souvergn only last a month but look better than any sealant (on dark cars and that's just my opinion). There are waxes out there that can rival the best sealant on durability too though.
Sealants are generally easier to apply and remove. For example, Meguiars 21 (sealant) is easier to apply and remove than Meguiars 26 (wax)...both are pretty easy though so might not be the best comparison.
Also, waxes usually give more of a deep glow while sealants are known for high reflectivity....like a miror or glass.
It's all in perference. I always do 2 coats of a sealant topped with a good wax to get a little of both looks. Also, I think sealants usually make the finish slicker than a wax and don't attract dust like a wax. Waxes use oils (carnuba oils) to help protect your finish and to give the deep wet look. Oils attract dust. Sealants don't use those oils and almost repel dust IMO.
Again it's all preference, but if I was only limited to a single coat of sealant/wax, I'd choose a sealant everytime..... again, that's just my opinion on which is better for me.
-
You don't need to apply both a sealant and a wax unless you really want to. They both do the same job (essentially), they just do it in slightly different ways (chemically). The only reason to use a sealant and wax both is to get the perfect look. You'll get no extra protection out of using both and a little extra durability, but not much.
-
Yeah, with wax, you just need to get it on the paint....don't rub hard, just get a nice thin coat on there. Let it haze and remove. With sealants, the longer you let it haze the better, with wax remove it as soon as it hazes or it will get difficult to remove.
-
microfiber rags rock , i got a few. necessary tool for a good job really , when it comes to waxing or buffing.
I agree. Microfiber Rags are a godsend on glass, quick detailing and wax/polish removal. I still use good ol terry cloth's for all my dirty work though.
-
You won't get any paint correction out of a wax whether you use a buffer or by hand, so you really don't need any elbow grease. Trying to correct the paint by hand is where you would need elbow grease......and you still wouldn't get too great of results.
-
Drying it with a "drying" microfiber towel or I even use the good ol absorber, will not swirl your finish. Once your car is washed and rinsed at the end, there should be no dirt on the car to swirl the paint. You could also use a leaf blower to dry it, but that tends to blow up a lot of dust.
-
Don't forget your windows, wheels, tires, and wheel wells. Spray down your wheel wells with tire wet to get them looking new again.
I covered all that Dan. There's no science in how to properly clean the wheel wells (since you can't swirl a wheel lining), that's why I didn't waste time on it. I did give a good tip on how to dress them after cleaning to make them look like new.
Also, if you wash your car regularly and always have a good wax job on the car, bugs will wipe off with no needed assistance. It's when they sit for a week or two that it gets hard.
What prep work are you talking about as far as a car wash? There is no prep work unless you're talking about wheel wells and such....I covered that....and like I said prepping for bugs is not needed if you stay on top of things......tar is not an every time thing, so not covered in this basic wash how to.
Steel wool on the windows is such overkill when doing a basic 2 bucket car wash, that I can't believe it was even mentioned in this thread. Again, this isn't a 2 hour guide to making your car ready for a show.....it's a guide to how to wash your car in less than an hour, make it look great, and not swirl your finish.
-
Pics would help. You'll probably need to machine polish it. Go browse on autopia.org and you'll learn everything you need to know to restore it yourself. The good buffer to get is the Porter Cable 7424 or 7336. That machine with the right combo of pads and polishes, can bring it back great. Just browse autopia and you'll find out exactly what is needed, but it will cost you about $250 in equipment/pads/polishes to get everything you need.
-
I could have sworn I'd posted this before, but couldn't find it and it wasn't in the FAQ section of the I/E section. Maybe CRG7 can add it in there.
-
'm going to go through the steps of how to wash your car using the "2 bucket method". This is a sure way to prevent swirling your paint through the washing process. A foam gun is another safe method, but more expensive and more timely IMO.
1. Fill 1 bucket with 2 gallons of Rinse Water (no soap)
2. Fill a 2nd bucket with 2 gallons of water/soap solution (your choice of car wash soap)
Let me explain the logic on this real quick. Using 1 bucket, every time you wipe a dirty panel and re-dip into your soap solution, you're putting that grime into your soap solution. As you go through the wash, your soap solution will get contaminated and you'll be spreading grit and grime on your car's finish.
By adding a second rinse bucket you can rinse your mit after each pass on the car, before dipping it into the soapy bucket, thus keeping the grime out of your clean soap solution. So.....
3. Wet down the entire car
4. Dip your wash mit in soap solution and make one swipe on a panel.
5. Flip the mit to the other side and you can make a second pass
6. Dip the mit into rinse bucket a couple of times and ring out
7. Dip the mit into your soap solution bucket
8. Repeat 3 through 7 until finished with the car
9. Rinse your car completely
10. (neat trick here)..... Turn off the water, spray out excess water, remove the nozzle so it's straight running water...turn on the water.
Now run just straight running water over the car, from the top down. The water will sheet off and leave you very little to dry (this step only works if you have a good wax/sealant on the car).
11. Dry using 1 of two methods. First is a good Microfiber Waffle Weave drying towel. These hold a lot of water and won't scratch the finish. Dry lightly with no pressure on the paint. There are good Microfiber drying towels that are not waffle weave, but they seem to trap dirt and grime more than a waffle weave. Second option is to use a leaf blower. If you use a leaf blower, then step 12 is a requirement as the leaf blower will blow off the water, but some minerals will be left behind that need to be wiped up.
From here on out is completely optional (unless you blow dry)
11. Quick Detail the car with your favorite Quick Detailer and Microfiber detailing rag. I've used Megs. Last Touch (order only product) and it works great but lately I'm using FK1-425. This stuff is ridiculously slick and has anti-static properties that keep your car from attracting dust (it's not a dust repellent, it just cancels the attration of dust that you get with most carnuba waxes. FK1-425 is really slick to and you can order it from www.fk1usa.com in a gallon size for around $30. That's really cheap if you add it up.
Don't forget your windows, wheels, tires, and wheel wells. Spray down your wheel wells with tire wet to get them looking new again.
I think that covers my basic washing process using the 2 bucket method. Any questions, feel free to ask.
This process, start to finish takes me about 45 minutes now that I'm used to it, so it's not much longer than a conventional wash.
Cleaning your Engine Bay?
in Interior and Exterior
Posted
Yup....good tip. Also using distilled or softened water for the final rinse will prevent water spots in the hard to reach areas.