

Marasmus Hondas
-
Posts
9 -
Joined
-
Last visited
Content Type
Profiles
Forums
Events
Gallery
Articles
Media Demo
Posts posted by Marasmus Hondas
-
-
So, as some backstory, I started off my driving career in an old beat up 1995 Accord sedan. Even before I had to give the ole thing up, I started to look into how any car could be superior to my (at the time) best car of my life. I discovered Honda's previous and newer generations of Accords, none of which I loved like my own so I decided to dig deeper into my own generation of Accords. The fifth generation of Accords (1994-1997 model years) definitely had some
The 1997 models of Accords came in four trim levels.*: DX,LX, EX and SE (Special Edition)
SO, what are the differences between the 1997 Accord LX, EX and SE trims?
The special edition badge and lineup was shared with the Honda CRV and included a unique set of amenities.
In the CD5 and CD3 Accords, this included a woodgrain trim around the radio and shifter, Unique aluminum rims, a security system which had an indicator light built into the woodgrain radio bezel, "Special Edition" floor mats and of course a special edition badge to tie it all together.
This project has had several "operations" throughout the years, here I will bring together all of my operations into one easy to navigate document.
Aluminum Rims: https://www.hondaforums.com/topic/50422-1997-accord-special-edition-rim-restoration/
Note: Even though it might not have been the most difficult to obtain the materials needed, including the rims, this was by far the most difficult out the whole project.
Security System: https://www.hondaforums.com/topic/50042-96-97-accord-accessory-security-system-plus-add-ons/
Note: After some long nights of research and long days of searching junkyards, the actual process of installation was not a difficult one.
Note 2: This also includes the installation of the security system siren, which works for a substitute for the SE stock security horn.
Woodgrain Bezel:
Note: Can be an expensive operation to complete, as these very same bezels go for hundreds of dollars but I have been lucky with my findings at the junkyards.
Radio Swap and upgrade:
Note: This was full of surprises around every corner which yielded a very satisfactory result,
-
I was in the junkyard one day taking apart a 95 wagon and it occurred to me that the rear door speakers would really look good in my car. Thinking it would be a giant hassle, but for shits and giggle I took the door panel off and compared to that of a rear door on a sedan 95. Wouldn't you know it? They were the same! The only difference was that the wagon had a speaker grill drilled into it. I took this logic and compared my 97s door panel to a 97 wagon and BOOM! Light bulb. All I needed to do was either replace my door panels with a wagon's or cut mine to accommodate the speaker... I decided to do it the hard way.
Tools I used (but I am sure you can substitute out others)
-Phillips head screwdriver
-Thin wide trim panel remover (Cloth covered flathead works to)
-Pencil (Dry erase marker could work as well)
-Drill bit ( 7/16ths size but had to circle around to achieve that 1 cm diameter)
-Ice pick (Big nail or fine point)
-Dremel tool (A circular saw)
-Wire strippers
-Quick disconnects for wires
-Soldiering iron (Not necessary, could use connectors in lieu of)
- gauge wire
Here is how the Honda Service Manual says to replace/remove the door panel speakers on wagons and sedans...


So now I need:
Two 2-Pin speaker connectors
Two 5th gen door speakers (My old new ones work)
Two wagon rear door speaker adaptors (What the speaker is held by) P/N: 39122-SV5-A00
Six yellow insert nuts for the screws (The holes are in diameter)
Two wagon "Ivory" rear door speaker grilles P/N: 83753-SV5-A000***
I bought a door panel from a 97 Accord wagon, then measured the speaker cutout so we all could go about recreating this in our sedans. It is as follows...
Here is a picture of the actual door panel from both sides, with things labeled for simplicities sake. Keep in mind that my door panel is from the drivers side, so the cutouts must be reversed for the passenger side


I first measured the cutout freehanded (with a ruler) and got the following...
Two 1* centimeter holes that are 1** millimeter (ish) shy of one centimeter from the speaker grille cutout itself.
14 1/2 centimeters from the door panel courtesy light is the lower corner of the exdent (Which is 2 1/2 x 3/4 centimeters long and wide respectfully).
The top straight line is 12 1/2 centimeters
The bottom straight line is 13 1/2 centimeters
Front slanted line 4 1/3 centimeters ( side without outdent)
Rear (Towards back of vehicle) slanted line 9 1/2 centimeter ( side with outdent)
Next, because I realize I am not perfect, I traced the holes and speaker cutout on a letter size piece of paper (8.5 x 11 inches) width and height respectfully. I did this both of curiosity and peace of mind in getting an accurate measurement. Below is a scan of said paper, which should be able to be printed off as a letter size paper template.
I did this same thing except instead of pencil I used spray paint, just for another view and measuring tool. Again on a letter size paper and uploaded as such.
Will edit and keep it updated when I make any progress...
*Or 0.393701 Inches
**Or 0.0393701 Inches
***RR Door Speaker as it says on the part itself, I assume the part number is different per color and position (Drivers or Passengers)

-
A smaller topic I had an idea for, I know some of these still already exist however I cannot find some of them anywhere.
I will update it with more as I come across them, or if you all have some to add.
Just another tidbit. I have all of the manuals for the 1997 Accord model year (minus the V6 supplement). If anyone needs a page or two.
1997 Accord Fog Lights.pdf -96-97 Accord USDM Fog Lights
Fog Light Handling.pdf -96-97 Accord USDM Fog Light Circuit Diagram and bulb/lens replacement
1997 Accord Front Tweeters.pdf -Not just for the 97 Accord but for a couple other models and years...
1997 Accord Truck Spoiler.pdf -96-97 Accord OEM Spoiler
-
The Land Rover parts for the lens is XGB000030 for the left, cannot find one for the right.
-
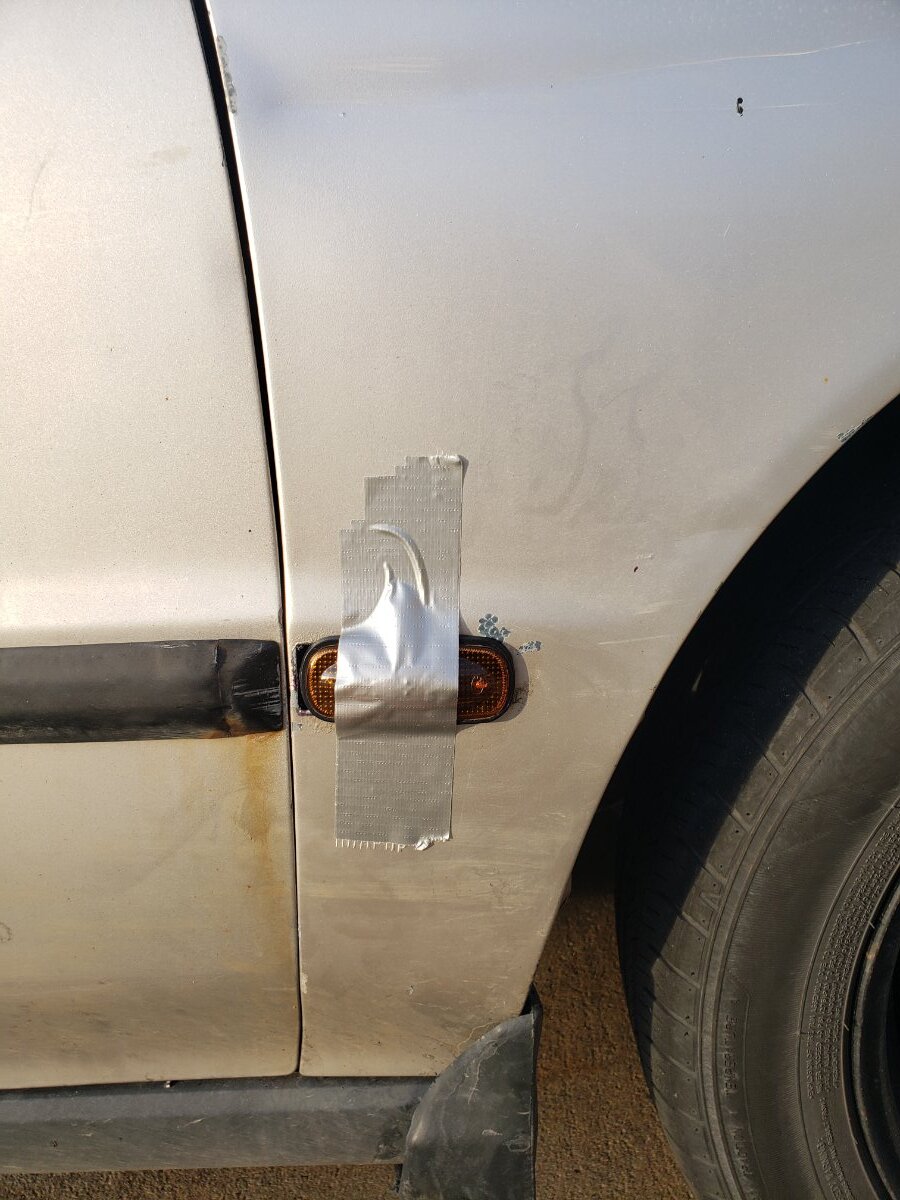
So I decided that I was going to try my own hand at installing these cornering lights you all are making look so cool. (Also I think the 94-97 Accords lack a side view blinker anyway...)
But to start off I will say that I "borrowed" some lights from a 2002 Land Rover Discovery Series SE, I lack the detective work and the funds to go OEM/JDM and purchase my own new set of lights. Plus I like the way they jut out just a bit to be flush with the black trim on the lower parts of the doors. Which is also the reason I opted to go with the lower location for the lights, to remain as flush and streamlined with the existing trim as possible.
I will try and go through all of the steps I did to make these puppies work but I would be lying if I said I did it on my own. I referenced the electrical manual (as I usually do, publication number: 61SV405EL ) I used this template found here https://honda-tech.com/forums/honda-civic-del-sol-1992-2000-1/end-all-diy-side-marker-post-813522/page3/ (Great job BTW Trixiem and 137 over on Honda Tech)
As well as assistance from a local shop to help grind the holes and provide much needed sarcastic remarks. And I cannot forget my cousin and red-faced friend for helping me with the bumper and soldiering.
First step is as you all know taking the proper measurements and cutting the hole. I printed out the template and traced it on the fender using sharpie (So it bleeds through/ punctures the paper) Than proceeded to make my shop-mate use the Dremel to cut the hole, which I then sandpapered down and painted 2-3 times, y'know, as paranoid people do.
 For whatever reason I cannot get this to be right-side up ;(
 The template after I was done using it...
Second step is to test the lights themselves, these specific lights have two disconnect points from the lens itself. The bulb unscrews from the lens, but also can be unplugged from the wiring itself, useful in the event of needed maintenance. I put some grease on the black rubber surrounding the bulb before screwing it in to prevent shorts and corrosion. Needless to say they worked (With new bulbs).
Third step is to measure and cut your wiring. I tapped into the power for the blinkers using the shown green wire (with a blue stripe and two white spots)
 This requires you undo the inner tire molding (Mine was eaten by an interstate already). As well as unwrap the bundle of inner fender wires and sort through them.
The ground was found on the passenger side in the form of a radiator mount bolt (Un rusted and cleaned up of course)
 Before connecting to a ring connector, I opted for the closest bolt so I could go inside the frame.
For the drivers side I had an easy solution; the siren bracket bolt. (I am referring to my security attachment siren, but SE owners will have one very similar in the same exact spot) Or for you ABS owners out there (Yuck ABS 🤢)The EGR valve or ABS bracket bolts could work as long as they are clean where you attach the ring.
 Don't mind my bird's nest of wires this was a temporary way to test the lights and the grounds.
Fourth step is to solder, connect or tape your wiring together and hope (Or pray, whichever one you think will get the job done). Me? I did a combination I put some grease in all of connections and slapped it all together.

Here I show off my rusty steelies 😓, and my quick disconnects to the lights, with one being wrapped up and the other needing the tape.
Fifth step of course is putting it all into where it belongs, rewrapping the fender wires, grounding the grounds and running the wires. And sliding the lights into their new homes. As much as I trust English engineering and my Dremelling, I still applied sealer to the inside of the lights and let it set.
 The fender was already f-ed up before the job but all the same I would recommend some sort of protection. The tape is to help the light stay in place during the wiring and such.
SO, overall results... I am very satisfied. The lights have lasted a good month or two at this point with no issues, and through a 1200 mile road trip up and down Pikes Peak, as well as snow and ice.


For whatever reason I cannot get this to be right-side up ;(
Speaking of that trip, here is a video (going the speed limit 😉) in middle of nowhere Kansas. WARNING FOR HEADPHONE LISTENERS
Electrical Manual Pages Referenced... (I even included the wagon pages)


-
So let me start off by saying that this will be a living document, I will definitely take comments, concerns or anything y'all have to add. Thanks guys!
For organizations sake I have gone here to label the different sections of my ranting...
Stock Speaker Options From 1997
Stock Radios From 1997
Accessories for 5th Gens and Beyond
I thought it was interesting all of the different audio options that Honda offered for the 5th gen Accords (1994-1997) and similar years of Hondas. So I decided to collect all the data I could find to help organize my findings, and maybe include some of your own input! Of course I have included as many of these OEM extra accessories I could get my hands on into my own vehicle, and I have modified them in my own way. So I will include these in here as well.
To get started I will include the stock options that Honda included in their 1997 Accord pamphlet. (Publication number is: Z0712)
LX: 4 X 12.5 watt speakers (4 of them, 1 in each of the front doors and 2 in the rear back)
Wagon: LX: 4 X 12.5 watt speakers (4 of them, 1 in each of the front doors and 1 in each of the rear doors)
 Rear 15 watt LX speakers
EX: 4 X 20 watt speakers (6 of them, 1 in each corner of the dash board, 1 in each of the front doors and 2 in the rear back)
Wagon EX: 4 X 20 watt speakers (6 of them, 1 in each corner of the dash board, 1 in each of the front doors and 1 in each of the rear doors)
 Stock EX tweeters

These few are some pictures I have taken over the years cataloging my finds, including what appears to be stock in some various vehicles. However I have observed over the years that 1997s do not always come with these speakers but the following replacements, whether they are aftermarket speakers or a dealer special I do not know, and that is where I was hoping one of you could fill in the blank...
 For Example: In my car these came in it originally, and I have seen many a 97 Accord have these in them in the salvage yards.
 I also have came across this variant but I have no idea what the difference is between the two.

 The current rears as well as the fronts that replaced the 22-year-old stock speakers.*
I am a big fan of the OEM radios, but I know most of you have long since replaced yours... however I will like to point out the differences in radios through the various trim levels. All of which seem to work just fine running the 6 speaker set up offered in the EXs.
DX* and LX: AM/FM Stereo Cassette player
EX: AM/FM Stereo Cassette player but has an anti-theft feature built in
SE: Includes an AM/FM radio input, but instead of a cassette player built in, it is instead a CD player (A good smart choice by Honda I think) Also includes an anti-theft feature.
Another side note: the Acura CL of 1997-1999 (I believe it is those years correct me if I am wrong) has the same exact radio as the SE trim but it has a different face plate saying "Acura Bose Audio" instead. Since some of these Acuras had stock amplifiers, my money is that the wiring pinouts are slightly different, but it warrants experimentation...
Here I have the possible addons that Honda offered not just for these Accords but for other models as well (As you will see exemplified by these subwoofer upgrades)
Tweeters: Part Number: 08A55-371-010 Installation Instructions Publication No.: All 18597
These were not the tweeters that the EXs were provided with (Even though the process would most likely be very similar), these were offered in several years and models of Hondas, such as the Civic and Prelude. And in each case I believe that they get installed in the doors like in my Accord.
These fun little speakers actually do provide a much more spatial experience, I was pleasantly surprised after the install. The official Honda instructions were followed when I installed them, they can be found in my page with other various instructions by Honda.
Subwoofer Upgrade: Part Number: 08A55-371-210 Installation Instructions Publication No.: All 20442
Also offered in other models of cars, these 60 watt speakers are obviously a great upgrade for any trim, body style or model.


These were the best audio upgrade I have done so far, impressive base even by today's standards. (My personal favorite songs that truly take advantage of these speakers include Got Your Six and Faster Than The Flame.)
*Was offered only as an addon to the DXs much like cruise control and air conditioning
**Funny story on these speakers, I actually went into the Honda dealer in town and asked them about speaker replacements for my 97 Accord, they then sold me all 4 new speakers for 65 something US dollars. A good deal, but not stock in 1997 that is for sure.
-
Thanks to a friend from HondaSociety and some repeated trips to the local junkyards I have finally been able to secure the parts necessary to install the accessory security system for my 1997 Honda Accord. So let’s get to it!
Operation: Security System/ Keyless Entry
Project: Specialization of The Accord
See here for my master post for this project: https://www.hondaforums.com/topic/50421-specialization-of-the-accord-wip/
The goal of this post is to hopefully build on some earlier posts on several sites regarding the security system: 08E51-SV4-102-f
Content:
- Introduction
- Installation of System Itself
- Wire Harness Diagrams
- Add-ons (Siren and Hood Switch)
- Honda Manuals
Introduction
This system was sold as an accessory for a number of models, not just the 96-97 Accords, however they all used the same “brain box” or ECU (Part number: 08E51-SV4-1M0-F2)* The fun part is finding or fabricating the wire harnesses to connect to the car’s ECU and relays, I have the electrical diagrams for the 97 Accord Coupe, Sedan and Wagon but I do not have the diagram for the 96 or other models. I would imagine the 96 Accord wouldn’t be too much different.
This system can be added to any trim or body style except for the Special Edition Sedan and Coupe Accord sold in 1997. Honda says it is compatible with all trim and body styles in the 1996 Accords however. I know for sure it is compatible with other models with similar years I do not know for sure which ones. 😪
As I include official Honda manuals and excerpts I understand I cannot take any profit from spreading their publications if Honda themselves ask, I can delete the specific book excerpts.
One Final and IMPORTANT note: If you use this article and passages provided from Honda, realize you yourself take all responsibility for all the risks included. Please do be careful when working with your vehicles delicate electrical systems. For both your well being and the well being of your vehicle.
Installation of System Itself
At first I thought I would have to fabricate a wire harness using some old vehicle harness and the Electrical Troubleshooting Manual (More on that later...) but luckily I found one system at the junkyard here in town. Since I found the exact harness for my car I just followed the Honda official Instructions to install it into my car. Here is a link to a website that has the instructions. https://manualzz.com/doc/24263160/installation-instructions ( If the link is broken please hit me up, I have the pdf.)
Some steps I did not follow were steps
5-8: I did not put the LED in the place Honda suggests. Instead I took the wire and soldiered it into a SE Security Indicator.
(Off Indicated/ Disarmed)

(Armed or Arming)

10-12: I did not put the valet/disarm switch out in the open like Honda suggests. (I thought that would defeat the purpose...)
Wire Harness Diagrams (And physical pictures)- Sorry in advance for the crude handwriting if you need any clarification don't be shy.
- These wire harnesses were specific to the 96-97 Accords, the following pictures are from my 97 Accord wire harnesses ONLY.
- I refer to each wire pin end by the number of spaces that each one has, NOT by how many wires are going to and/or from.
- The smaller numbers for each wire in each box are the pins from which the wires go into/come out of.
- I tried to be as clear as possible but I am not an electrical engineer sorry...
Drivers Door Wire Harness (I did take most of the tape and black wire tubing off for the pics)


Main Wire Harness*+*


Add-ons (Siren and Hood Switch)
I was blessed to find the siren add-on kit on Ebay for a decent price and let me tell you, it was worth it, it is much more attention getting. I will try to include a video of a comparison of horn vs siren.*+** The kit that I found also included the wiring harnesses necessary to route the siren in the hood and to the hood security latch. (I did not buy the exact hood latch that Honda put out to go with the security system, instead I “borrowed” one from a 97 Accord Special Edition. I’m sure a 97-99 CL hood latch could work as well.**)
The installation instructions are pretty simple, I do not think most of you will need it. But if need be, you can ask any Honda Dealer for them (Publication Number: All 17997). I did not follow them for the most part. I routed the siren wiring through the drivers door and I have had no issues so far.
I also installed the siren where the SE stock siren is...

The hood latch from the SE worked perfectly (after I gave it a good ole cleaning) and bolted right in and plugged right into where the Security System Hood Latch is supposed to go in.


Siren Kit Part Number: 08E49-SV4-101F
Siren Part Number: 08E54-SV4-1M0-01
Security System Hood Latch Part Number: 74120-SYL-AOL
Honda Manuals
If you need a copy of the Security System operating Instructions (Part number: 08E51-SV4-1F11-81 Reference Number: HFS-610) this website has it. https://www.manualslib.com/manual/69038/Honda-08e51-Sv4-100-F.html?page=9#manual ( If the link is broken please hit me up, I have the pdf.)
Excerpts from the Honda Electrical Troubleshooting Manual (Part Number/Publication Number: 61SV405EL)***
*Honda also calls it Security Control Main Unit
**Shoutout to James Matteu for that idea of using those latches. Here is his article on the same subject https://www.hondaforums.com/topic/26506-5th-gen-accord-usdm-security-system-woptions-from-1g-cr-v/
***Honda in the Manuals calls this system The "Optional Security System" to differentiate it from the stock system that came with the SE trim.
-
Thanks to a friend from HondaSociety and some repeated trips to the local junkyards I have finally been able to secure the parts necessary to install the accessory security system for my 1997 Honda Accord. So let’s get to it!
Operation: Security System/ Keyless Entry
Project: Specialization of The Accord
The goal of this post is to hopefully build on some earlier posts on several sites regarding the security system: 08E51-SV4-102-f
This system was sold as an accessory for a number of models, not just the 96-97 Accords, however they all used the same “brain box” or ECU (Part number: 08E51-SV4-1M0-F2)* The fun part is finding or fabricating the wire harnesses to connect to the car’s ECU and relays, I have the electrical diagrams for the 97 Accord Coupe, Sedan and Wagon but I do not have the diagram for the 96 or other models. I would imagine the 96 Accord wouldn’t be too much different.
I was blessed to find the siren add-on kit on Ebay for a decent price and let me tell you it was worth it, it is much more attention getting. I will try to include a video of a comparison of horn vs siren. The kit that I found also included the wiring harnesses necessary to route the siren in the hood and to the hood security latch. (I did not buy the exact hood latch that Honda put out to go with the security system, instead I “borrowed” one from a 97 Accord Special Edition. I’m sure a 97-99 CL hood latch could work as well.**
Siren Part Number:
*Honda also calls it Security Control Main Unit
**Shoutout to for that idea of using those latches.


1997 Accord Special Edition Rim Restoration
in Accord
Posted · Edited by Marasmus Hondas
Adding pictures and tags
Operation: Special Edition Rims
Project: The Specialization of The Accord
I was lucky enough to come across a kind gentlemen who owns a junkyard, in it, were four non-bent aluminum SE rims. Of course, having sat in a junkyard for a number of years will yield some damage and deterioration. This post is both my findings in experimenting with different techniques and brands of clear coats and my next step in upgrading my 1997 Accord.
Rim 1 and 2 were both very similar in the damage they had suffered, both cosmetically and physically. With widespread clear coat destruction and aluminum corrosion on the face and back of the both. The edges of both were scratched up pretty good, necessitating the need for a body filler. I sanded them down consistent with the instruction on my Bondo container, from there I sanded down the Bondo and continued to work away at the existing corrosion with the sand paper grits as shown below. With very similar damage and processes in their repair, I expect very similar end results, even with the different brands of clear coat.
Rim 1:
Before:
Rim 2:
Before:
Rim 3:
Before:
Rim 4:
Before: